SECTION 1. Skin Graft
25/10/14
And so it begins...
Step 1 - Find out if cutting slot in roof causes roof to sag.

One new hole and no sagging!

The offending bit of rust

Step 2 - Clean up edges and remove rust from cross-member using angle grinder.

Step 3 - Cut section of metal and offer up to hole. Mark with pencil.

Step 4 - Cut approx 10mm away from pencil edge

Step 5 - Use joggler to put step in repair panel

Step 6 - Put panel in place and wedge in with screwdrivers.

Step 7 - Spot weld to hold in place, then alternate spot welds until all welded in nicely.


Step 8 - Grind off excess external/internal


Step 9 - Remove distortions using specialist tools and blocks of wood/hammers. Step 11 photo shows distortions removed or as good as possible - filler will cure this.

Step 10 - Rinse and repeat steps 1-9 on other areas.

Step 11 - If there are two of you, start preparing bodywork for flexible filler. In the foreground you'll spot the area has had the distortions removed and sanded back to bare metal .

End of day one (today 11:00-19:00) - front sections first coat of filler

Day 2 - sorting out the rear.
Pretty much the same as the front, but only 2 sections of rust to contend with. All sanded back ready for filler.

Two coats of filler and it's time to call it a night.

There are more coats needed until it's perfect, but at least the welding is now complete.
In case any of you were wondering how I made sure I kept the curvature of the roof, I used this "Mitsubishi FTO repair kit". Note: No rust! That's just the glue you can see.


I won't bore you with the coming filler images. Finished (for now) in grey primer. It is just a seal to stop the moisture getting at the bare metal/poly filler.

09/11/14
SECTION 2. Cheek Replacement
This weekend's work was interesting as we had to make entirely new panels from our trusty Mitsubishi FTO Repair Kit.
A quick survey of what we had to work with:


First off, cut out the rust back to nice shiny metal:


Fashion patch panels:

Do a spot of welding:


Fashion next panel:


More welding and then a spot of grinding smooth:


Hard to spot, but drainage hole put in as part of patch panel at lowest point:

A new rear end!


A plastic polymer was used to seal all the holes prior to the 20yr old red oxide paint used (which is waterproof, unlike primer of today!)

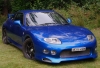
Rather than show you a similar repair to the other side, here's the final shot:

22/11/14
Cutting out the outer arch section.

Just a bit of rust in between the panels.

Cut out, grind back and cut a straight edge.

Cutting out the rust on the arch.

Prepare area for trial fit of patch panel.


Patch panel trial fit.

Apply Neutrarust to protect metal.

RAIN.... It must be time for lunch!
Cut slot for patch panel.

Clamp in place.

Adjust panel and close gaps by gently tapping the panels until they match.

Draw curve onto board so that you can create the inner arch.


Using Ford arch panel, mark curve and cut out.

Trial fit patch panel.

Clamp in place and spot weld.

Tying up lose ends...literally.

Spot weld outer arch patch panel.

Grind spot welds and paint up all exposed metal.

That's it for this weekend.
05/12/14
Reshaped and "finished" for the moment.


Behind the scenes:


15/12/14
SECTION 3. Thigh Replacement
In the lower section of this photo, the "metal" just crumbles/flakes off in big chunks of rust.

Before doing any cutting, the new sections needed fabricating:


Cut out the rust and ground back to shiny metal.

Find out the rust covers a larger area, so more comes out.


At this point it should be noted that the metal here is structural and as such is approx 2mm thick. Patch panel created and welded in place - say goodbye to that grommet!


Painted to avoid rust coming back. New sections waiting to be welded on.

The right hand side received a light tap from a hammer and highlighted the same problem.

31/01/15
It's been a while due to back injury, Christmas and it's a tad cold, but here's a small update for the cheek repair.
Starting from the first poly fill done early December.

Sanding back the high points.

Once the high points were gone, the rest was hand-finished.

Finally a red-oxide paint finish to protect from the elements.

Before & After

 [/QUOTE]
07/02/15
Cheek Repair after today's session.
Fabricated end piece and welded in.

Seam sealer used to finish before painting. Note the addition of a drainage hole. My SLK has drainage pipework like this, so if Mercedes think it's a good idea, I'm having it too.

The copper pipe to be used for drainage.


Poly-filler followed by sanding and red-oxide paint. Passenger side done.

On to the drivers side.

Grind back to good metal and remove rusty sections.

At this point our technique had improved and we're spot welding in addition to a seam weld.

Fabricated end piece and welded in.


Seam sealer and red-oixde paint to finish. No poly-filler needed as didn't have to cut as much out.

Time to tackle another section of rust in the arch.

Patch plate and joggler to the rescue.

A spot of welding.

Welds ground back.

Poly-filler, more red-oxide paint and job done for the day.

08/02/15
SECTION 4. Kidney Repair
This is what happens when idiots jack the car up on it's rails. If you've got bent/crushed rails, there's a good chance you have rust and potentially water ingress (like me).
In search of some good metal to weld the not-yet-fabricated patch plate.

More rust..., but wait, the end is in sight. The cables you see are for the heated seats.


And it's gone. Rust was ground off, but no photo as I was working on repairing the other grinder.

Patch panel trial fit.

Welding it in place.

Welding was spot on, so no need for grinding.

Ground-side panel welded in and seam sealer applied to both sides.


The drivers side...

Bugger, it's worse. Yep, that's a hole to the outside world you see in the left of the photo and the rust follows the seam into the corner and round.

28/02/15
SECTION 5. Heart Transplant
This proved a little more challenging than expected due to rounded nuts on some of the mounts. It came out today, so we met our target. Not too many pictures, but you get the gist.
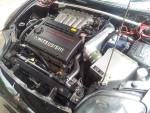
All parts removed from engine in preparation to put on the hoist.

Releasing the gearbox nuts (rounded buggers, which meant cutting them off with a hacksaw).

Lifting the body to provide enough room to remove the engine & gearbox.

Voila! In the garage just as the heavens opened up!