The Suspension Thread
Moderators: IMC, Club Staff
-
Sahin

- HULK
- Posts: 5519
- jedwabna poszewka promocja
- Joined: Wed Oct 05, 2011 10:38 pm
- Location: Up to me nuts in boys guts
The Suspension Thread
You worded that as if it's your shout lol
-
PHIL069
- Oldtimer
- Posts: 4719
- Joined: Sun Sep 20, 2009 5:00 pm
- Location: Central Coast > South Australia
Re: The Suspension Thread
I will calculate my remaining tax money and let you know 
mikeey01nzl wrote:Hats off to you too Phil for spending so much time on the phone trying to help someone out, your a top man and only a few would've spent so much time. well done!
Daniel2019 wrote:Come on phil, we bonded at the bonfire, lets be honest here...me and phil are besties now...
-
Shane001

- Oldtimer
- Posts: 2730
- Joined: Tue Jul 21, 2009 5:00 pm
- Location: Sydney
- Contact:
Re: The Suspension Thread
Ben, why stick with the GPX style drop link, why not switch to the GPvR style?
-
Bennoz
- National President
- Posts: 23678
- Joined: Fri Jan 21, 2005 6:00 pm
- Location: Sydney
- Contact:
Re: The Suspension Thread
Because my lower control arms are cast Evo III items, you can't just tack a bracket on. I'd have to change to Evo IV ($150 a pop) or the alloy Evo V ones at $200 a pop as they have the mounting point on them. I've spent enough on that arrangement as it is
-
spetz

- Oldtimer
- Posts: 2915
- Joined: Wed Mar 03, 2004 6:00 pm
Re: The Suspension Thread
Are there benefits of using Evo III arms?
btw I think to use Evo IV-VI LCA you have to use the knuckle as well
btw I think to use Evo IV-VI LCA you have to use the knuckle as well
-
Bennoz
- National President
- Posts: 23678
- Joined: Fri Jan 21, 2005 6:00 pm
- Location: Sydney
- Contact:
Re: The Suspension Thread
The cast arms while heavier, are a lot stronger & flex less than the pressed steel FTO ones.spetz wrote:Are there benefits of using Evo III arms?
btw I think to use Evo IV-VI LCA you have to use the knuckle as well
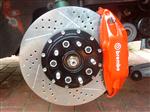
Correct, I use a V knuckle or hub as I call it because of the ball joint difference (plus the hubs are what governed the Brembo caliper choice.)
I had to use IV/V ball joints in the III arms (normally they have the tapered style like the FTO ones) to make it all work.
-
Shane001
- Oldtimer
- Posts: 2730
- Joined: Tue Jul 21, 2009 5:00 pm
- Location: Sydney
- Contact:
Re: The Suspension Thread
Why can't you weld a bracket on cast?Bennoz wrote:Because my lower control arms are cast Evo III items, you can't just tack a bracket on.
-
Bennoz
- National President
- Posts: 23678
- Joined: Fri Jan 21, 2005 6:00 pm
- Location: Sydney
- Contact:
Re: The Suspension Thread
Mild steel to Cast Iron is very low carbon to very high carbon steel. The weld pool will have high cooling rates, resulting in a brittle weld, prone to cracking. Not what I want on a suspension component like that...Shane001 wrote:Why can't you weld a bracket on cast?Bennoz wrote:Because my lower control arms are cast Evo III items, you can't just tack a bracket on.
-
Shane001
- Oldtimer
- Posts: 2730
- Joined: Tue Jul 21, 2009 5:00 pm
- Location: Sydney
- Contact:
Re: The Suspension Thread
Bennoz wrote:Mild steel to Cast Iron is very low carbon to very high carbon steel. The weld pool will have high cooling rates, resulting in a brittle weld, prone to cracking. Not what I want on a suspension component like that...Shane001 wrote:Why can't you weld a bracket on cast?Bennoz wrote:Because my lower control arms are cast Evo III items, you can't just tack a bracket on.
-
Bennoz
- National President
- Posts: 23678
- Joined: Fri Jan 21, 2005 6:00 pm
- Location: Sydney
- Contact:
Re: The Suspension Thread
-
spetz
- Oldtimer
- Posts: 2915
- Joined: Wed Mar 03, 2004 6:00 pm
Re: The Suspension Thread
But if you hit the front wheels you'll bend the subframe?Bennoz wrote:The cast arms while heavier, are a lot stronger & flex less than the pressed steel FTO ones.spetz wrote:Are there benefits of using Evo III arms?
btw I think to use Evo IV-VI LCA you have to use the knuckle as well
Correct, I use a V knuckle or hub as I call it because of the ball joint difference (plus the hubs are what governed the Brembo caliper choice.)
I had to use IV/V ball joints in the III arms (normally they have the tapered style like the FTO ones) to make it all work.
With the LCA, I thought the Evo III and FTO ball joint is the same.
Do you know if you could use an alloy V or VI arm with the FTO knuckle/hub?
-
Bennoz
- National President
- Posts: 23678
- Joined: Fri Jan 21, 2005 6:00 pm
- Location: Sydney
- Contact:
Re: The Suspension Thread
Did you read my big brake kit thread? It goes through all of this.
-
spetz
- Oldtimer
- Posts: 2915
- Joined: Wed Mar 03, 2004 6:00 pm
Re: The Suspension Thread
No I didn't go through the whole thing, I'll check it out now
Edit:
Ok I went through the thread, but I was asking something else.
For those who want alloy LCA but do not want to upgrade brakes, is there a way to fit the Evo V/VI LCA onto the FTO knuckle, or are you forced to change the whole thing?
Also you mentioned the front end getting tighter, do you think that's the Evo III LCA or the anti lift bushes?
-
Bennoz
- National President
- Posts: 23678
- Joined: Fri Jan 21, 2005 6:00 pm
- Location: Sydney
- Contact:
Re: The Suspension Thread
You'd have to press out the ball joints & press in FTO / Early evo style tapered ball joints. You'd also have to modify the ball joint to sit at the correct height. Bit fiddly, but not impossible.
I recok its the arms, I already had the poly bushes on my old setup.
I recok its the arms, I already had the poly bushes on my old setup.
-
spetz
- Oldtimer
- Posts: 2915
- Joined: Wed Mar 03, 2004 6:00 pm
Re: The Suspension Thread
But you had the prefacelift bushes? Maybe that's why the Version R runs these, they are stiffer or something?
How much flex can the LCA really have though, they seem solid
How much flex can the LCA really have though, they seem solid
-
Bennoz
- National President
- Posts: 23678
- Joined: Fri Jan 21, 2005 6:00 pm
- Location: Sydney
- Contact:
Re: The Suspension Thread
I don't doubt they're a better design bush, hence the Evos use them as well, but my handling improvements weren't just limited to going round corners, my torque steer improved as well. They may look stiff, but add half a tonne onto them with a bunch of hp.
-
spetz
- Oldtimer
- Posts: 2915
- Joined: Wed Mar 03, 2004 6:00 pm
Re: The Suspension Thread
Do you think using Evo III LCA and converting to the newer bush style a worthwhile mod to do just for the handling improvement?
-
fraz91
- Hair-do
- Posts: 881
- Joined: Sun Jan 17, 2010 6:00 pm
- Location: 4wding over you, Sydney
Re: The Suspension Thread
I wouldn't imagine there'd be much improvement in a vehicle with the standard 2.0L 6A12 motor. Once you turbo that motor, or move to a different engine with greater output (4G63 or 6A13TT) you'll notice much more difference between the two, as the vehicle dynamics have changed due to the higher output.
I'll have an FTO one day... i swear!
until then:
1. 2001 Merc-Benz A160 (porta-loo on wheels)
2. 2007 Peugeot 307 TDi (more fun than you'd expect)
3. [url=ttp://ftoaustralia.com/v3/viewtopic.php?f=29&t=25373]2009 Mitsubishi Triton Di-D (a monster in its own right)[/url]
4. 1992 Nissan NX Coupe (club car and project car)
5. 1996 Holden SB Barina - "The Nugget"
6. 1996 Jeep XJ Cherokee Sport - The Budget Build
7. 2010 Toyota Landcruiser 76 Series - V8 Goodness... - Build coming soon.
8. 1990 Audi 90 manual - The delightfully dignified daily driver
Astron_Boy wrote:No correction needed Gen Y, you are correct.
Bennoz wrote:My rubbing happens on the inside.
-
Shane001
- Oldtimer
- Posts: 2730
- Joined: Tue Jul 21, 2009 5:00 pm
- Location: Sydney
- Contact:
Re: The Suspension Thread
OK, so continuing on from my post on page 21, now to get the new bushes in.
This was a bit more of a challenge then I originally anticipated, without a proper press the hardest part was trying to keep the bush straight as we tried to force it through the hole over the lip on the bush. After a few hours of cursing, we came up with the following which actually worked pretty easy lol!
First, working from the inside of the control arm, apply lots of lube and tighten a hose clamp around the bush housing as shown. This will help hold the bush straight to get it started. Check and double check you have the bush around the right way lol! Once it's in there you won't be getting it back out again! And don't forget the lube
Next we got a nice long bolt, with a big wide washer and put a 1kg barbell weight over the top, then sat the whole control arm / bush assembly over the bolt/barbell weight. Now put the steel inner sleeve over the bolt and push it down into the bush all the way, this will help keep the whole thing straight (this was actually the hardest part, keeping the bush from going sideways). Ideally you want a bolt that is a nice fit inside the steel sleeve.
Now more washers, starting with a nice big wide washer on the top, spanner on top and one on the bottom, and start tightening up the nut to pull the bush into the housing. You may need to tap it occasionally with a hammer to keep it straight.
You won't be able to pull the bush all the way in with the nut, so once you feel it bottom out, just get some pipe that will go over the top of all the washers and seat on the big wide washer at the bottom, and give it a few hits. Won't take much to push it the last bit, then it will pop through pretty easy.
How it looks with the bush all the way through.
This was a bit more of a challenge then I originally anticipated, without a proper press the hardest part was trying to keep the bush straight as we tried to force it through the hole over the lip on the bush. After a few hours of cursing, we came up with the following which actually worked pretty easy lol!
First, working from the inside of the control arm, apply lots of lube and tighten a hose clamp around the bush housing as shown. This will help hold the bush straight to get it started. Check and double check you have the bush around the right way lol! Once it's in there you won't be getting it back out again! And don't forget the lube
Last edited by Shane001 on Fri Aug 03, 2012 9:45 pm, edited 1 time in total.
-
Shane001
- Oldtimer
- Posts: 2730
- Joined: Tue Jul 21, 2009 5:00 pm
- Location: Sydney
- Contact:
Re: The Suspension Thread
Now you just need to undo and remove the bolt, tap out the inner steel sleeve so you can lube it up, put the sleeve back in, lube up the sides and it's all ready to go back in the car.
Piece of piss in the end
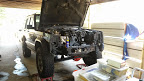
And finally a pic with the arm reinstalled.
Piece of piss in the end
Last edited by Shane001 on Fri Aug 03, 2012 9:52 pm, edited 1 time in total.