DIY?? Got Cracks or scratches in your bodykit?

General Questions and comments

Moderators: IMC, Club Staff

Post Reply
User avatar
bushido
Oldtimer
Posts: 1566
jedwabna poszewka promocja
Joined: Mon Oct 29, 2007 5:00 pm
Location: Sydney

DIY?? Got Cracks or scratches in your bodykit?

Post by bushido »

So when I got my car I never noticed it had a small poorly concealed crack in the top left of my series 2 front bar. After I got my import papers, I did a thorough check and found this crack, among some other things. Anyway a week later I did some poor parking and hit the front bar on the kerb. This action accentuated the crack and all of a sudden it was 15 cm long and growing. So I needed a way to fix this and my first move was to get a quote from a smash repairer. $500 fixed. A new bar painted in Scotia White was $750 so I said stuff that and decided to give it a go myself.

A few options were available to me. I have a small background in fibreglassing and thought it might have been possible to fibreglass the crack from the back after taking off the front bar. But aza told me it was a bitch to take off and I didn't have the time with packing to go overseas and what not. Went down to Bunnings and thought I might go with some good quality body filler, hardener and some good old fashioned sandpaper. Anyway here is what I did to fix my crack and with a few before and after pics. I reckon I did a pretty good job.

http://img301.imageshack.us/img301/7416/pic0013dz7.jpg {{before pic}}

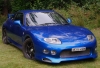
http://img301.imageshack.us/img301/117/pic0008mz7.jpg {{after pic}}

As you can see from the pics, the crack has gone completely and the only crappy part of the job is the paint. It is impossible to tell the area has been painted from a metre away, and only from close can you see any difference. If I had a coat of clear then it would be better but I was working with I had and I had to keep it as low cost as possible.

Anyway here we go!

1. I took off the sticky tape I was using to prevent any further increase of the crack and then began to sand down the area.

2. I mixed up some body filler and hardener. (brand was CAM).Chucked on a pair of gloves and pulled back the plastic mud guard area and applied a generous amount of the mix to the behind of the bar. I think it was just enough for me to see the stuff oozing out from the front of the bar.

3. Held the area together for 2 minutes. The body filler used was VERY quick drying. I guess you could hold it for longer but there really is no point.

4. Then repeated the process for the front side of the crack but using a (iinsert name scrapy thing). I made sure the filler was as flush as possible with the rest of the bar.

http://img183.imageshack.us/img183/5996/pic0001da3.jpg {{ this is how it looked like after i finished with the filler }}

5. I sanded the area preapred in (4) with fine sand paper until the area felt real smooth.Then mixed up some more body filler but this time using a less heavy duty filler with the same hardener. Applied it using the (insert name scrapy thing).

6. Used an even finer grade of sandpaper (was black and may have been grade 800?) to finish off the area.

http://img183.imageshack.us/img183/96/pic0005ew1.jpg {{looked like this just prior to paint}}

7. Painting time!! Used masking tape and newspaper to hide to areas i didnt want to get paint on. I went with about a quarter bottle of the Mitsubishi W83 touch up paint mixed with some turps. I think kerosene is just as good. Maybe because the touch up stuff is acrylic based I think so it turns out slightly thick if you just apply it as it. I used a spray gun connected to an air compressor to apply the stuff and put two coats of it on. First coat was without the turps. Second with turps (only a little bit though). I guess you could use the brush from the paint bottle, but a spray gun gives you a better finish. Oh and make sure you bleed the air hose line before you use the spray gun.

8. Let it dry overnight.

9. DONE! :D

and for measure another pic of the finshed front bar!! http://img99.imageshack.us/img99/7946/pic0007wg0.jpg

Hope this is of use to everyone!

All up it took less than an hour.
%%%%%%%%%%%%%%%%%%%%%%%%%%%%%%%%%%%%%%%%%%%%%%
###########Unofficially the loudest FTO in NSW???##########
%%%%%%%%%%%%%%%%%%%%%%%%%%%%%%%%%%%%%%%%%%%%%%
User avatar
KLRFTO
Apprentice
Posts: 35
Joined: Fri Oct 19, 2007 5:00 pm
Location: LITHGOW, N.S.W
Contact:

Post by KLRFTO »

wow 8O it actually came up pretty good :lol:
good stuff man, nothing worse then chunks and cracks in your front bar
Gotta love the look on the bogan v8 drivers faces when they hear the scream of 7500rpm mivec slaying there puny 5 litre paper weights with twice the power, yeah thats a FTO
User avatar
bushido
Oldtimer
Posts: 1566
Joined: Mon Oct 29, 2007 5:00 pm
Location: Sydney

Post by bushido »

Yeh it come up better than I would have thought and all for less than $30. :D
%%%%%%%%%%%%%%%%%%%%%%%%%%%%%%%%%%%%%%%%%%%%%%
###########Unofficially the loudest FTO in NSW???##########
%%%%%%%%%%%%%%%%%%%%%%%%%%%%%%%%%%%%%%%%%%%%%%
User avatar
RallyMad
Oldtimer
Posts: 1223
Joined: Tue Mar 25, 2003 6:00 pm
Location: Toowoomba

Post by RallyMad »

Looks bloody awesome for $30 mate. Good work. Agreed on the brush front in the touch up paint container as well, I've used it a few times and really need to get to what I've done with some sand paper to get the brush marks out.
User avatar
bushido
Oldtimer
Posts: 1566
Joined: Mon Oct 29, 2007 5:00 pm
Location: Sydney

Post by bushido »

Well maybe when you can be stuffed hehe. Oh and when youre sandpapering, have someone hold a vaccuum cleaner near where your sanding. All that dust cant be good for the lungs. I learnt the hard way. :cry:
%%%%%%%%%%%%%%%%%%%%%%%%%%%%%%%%%%%%%%%%%%%%%%
###########Unofficially the loudest FTO in NSW???##########
%%%%%%%%%%%%%%%%%%%%%%%%%%%%%%%%%%%%%%%%%%%%%%
User avatar
dstocks
National Vice President
Posts: 9529
Joined: Fri Jun 24, 2005 5:00 pm
Location: Utopia
Contact:

Front Bar

Post by dstocks »

Great job!

Have to say that the front bar isnt hard to get off though. Ive got it down to under 15 minutes now.
Complete FTO (http://www.completefto.com.au/completefto.asp)
    Image
    If you are trying to contact me and not getting a quick answer, its because im disorganised. Hassle me and ill get back to you
    User avatar
    RallyMad
    Oldtimer
    Posts: 1223
    Joined: Tue Mar 25, 2003 6:00 pm
    Location: Toowoomba

    Post by RallyMad »

    bushido wrote:Well maybe when you can be stuffed hehe. Oh and when youre sandpapering, have someone hold a vaccuum cleaner near where your sanding. All that dust cant be good for the lungs. I learnt the hard way. :cry:
    Thanks mate, sounds like a good tip.

    now, just when I could be stuffed............... :lol:
    Post Reply