Mine is a Tip so the measurements are for that but I’m pretty sure it would be the same for a manual.
Below are the measurements and process involved if anyone else is interested in doing the same:
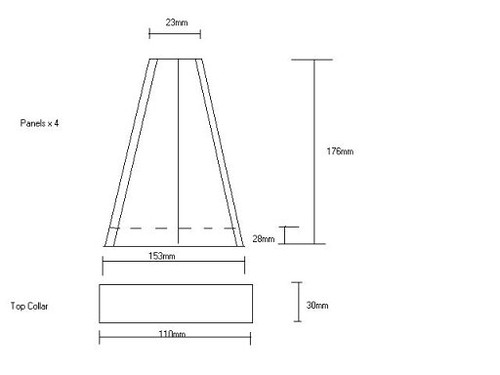
1. Prep: Measure and mark on the back of the intended material where you’re going to cut and later fold, and then cut out using a sharp pair of scissors. Don’t use a Stanley knife as this can crease the material as you’re cutting and cause a jagged cut.
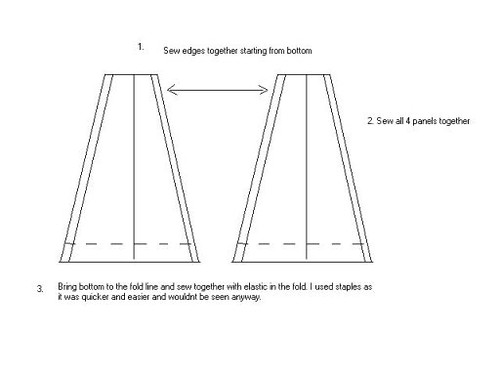
2. Sewing: I did mine by hand but if you’ve got a bored mum or grandma I’m sure she could whip this together in a fraction of the time it took me….. The main thing to remember is that you are sewing the edges together from the back (or inside out) of the material. Start from the bottom of the panel and work your way along the edge a couple of millimetres in using small stitches. Don’t panic if when you reach the top the panels are off in length because that will be covered with a collar in the final process. Repeat until you have an inside out pyramid of material.

3. Bottom: Fold up the bottom to meet the fold line you marked out at the beginning and chuck in a couple of staples to hold it in place. I found 3 per panel worked well with one in the middle and one on each of the edges. Get a piece of elastic roughly 450mm in length and feed it around the bottom edge, bunching up the material as you go. Once you have the two ends together put in a couple of stiches in the ends so they stay together. Add more staples all around the bottom so that it is secure.


4. Top: Turn the fabric the right way (not inside out) and pick one of the panels and staple the middle of the collar to that panel. Manipulate the collar and repeat the process to the panel on the left and right of your first staple. The collar should come together in the middle of the last panel, on the this panel cut down the middle 30-40mm as this will help you get it over your gearstick without removing your gearknob. This is not required if you intend removing your knob. Sew the bottom edge of the collar around the outside of the boot joining together the collar edges if you havn’t slit the last panel, leaving open if you have. Once complete turn the boot inside out and fold the top part of the collar down and repeat the process of stitching it to the panels.


5. Finishing: Now its just a matter of tidying up the edges of the collar with a couple of stitches and fitting around your gearstick using the original rubber collar will hide the staples at the bottom and ensure it stays in place.