Ah thanks for the offer mate.clint111 wrote:If you, god forbid, need a replacement top half of the inlet manifold, you can have mine for postage cost.
Robs new project Supercharger
Moderators: IMC, Club Staff
-
Rob Furniss
- Oldtimer
- Posts: 1394
- jedwabna poszewka promocja
- Joined: Wed Jan 19, 2011 11:32 pm
- Location: Perth
- Contact:
Re: Robs new project Supercharger
-
Rob Furniss
- Oldtimer
- Posts: 1394
- Joined: Wed Jan 19, 2011 11:32 pm
- Location: Perth
- Contact:
Re: Robs new project Supercharger
One of the water end tanks is now on, looking very messy 
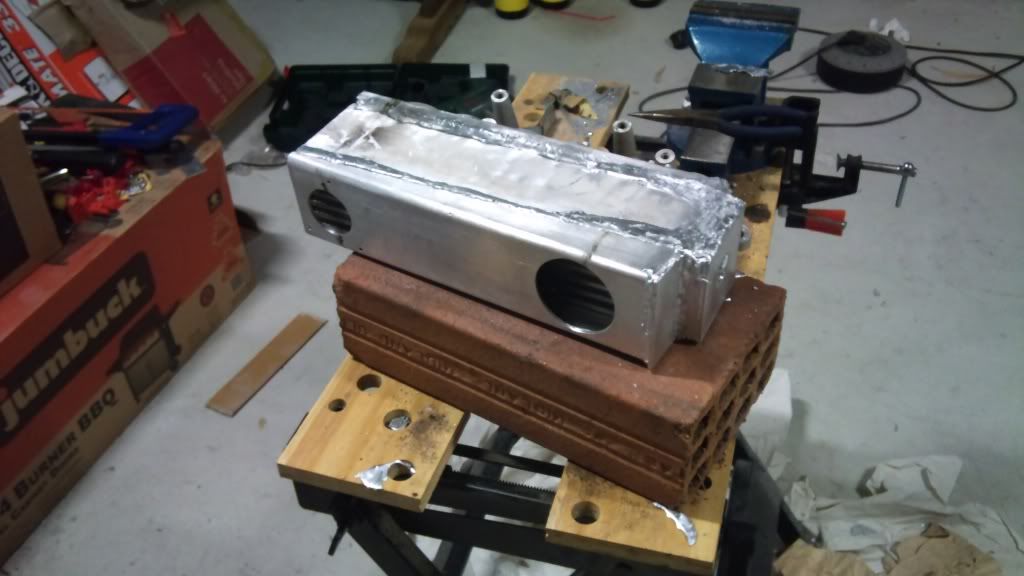
Just the other side to do now and i'm done, can then get on with cleaning it up.
Just the other side to do now and i'm done, can then get on with cleaning it up.
-
Astron_Boy

- Trolling Gen Y
- Posts: 8400
- Joined: Sun May 27, 2007 5:00 pm
- Location: Wine Country NSW
- Contact:
Re: Robs new project Supercharger
Nice progress.
With that side welded, have you again checked for leaks?
With that side welded, have you again checked for leaks?

-
Shane001

- Oldtimer
- Posts: 2730
- Joined: Tue Jul 21, 2009 5:00 pm
- Location: Sydney
- Contact:
Re: Robs new project Supercharger
Will you be able to pressure test for leaks?
-
Rob Furniss
- Oldtimer
- Posts: 1394
- Joined: Wed Jan 19, 2011 11:32 pm
- Location: Perth
- Contact:
Re: Robs new project Supercharger
I should be able to pressure test some how, will figure something out.
Just re-tested for water leaks and oh bugger it's still leaking so I went mental with the brazing rods. I shall re-test later on when it's cooled down.
If it's still leaking after this how about epoxy or silicone inside or is that a big no-no?
Or how about I throw the whole lot in the bin and go with a front mount IC?
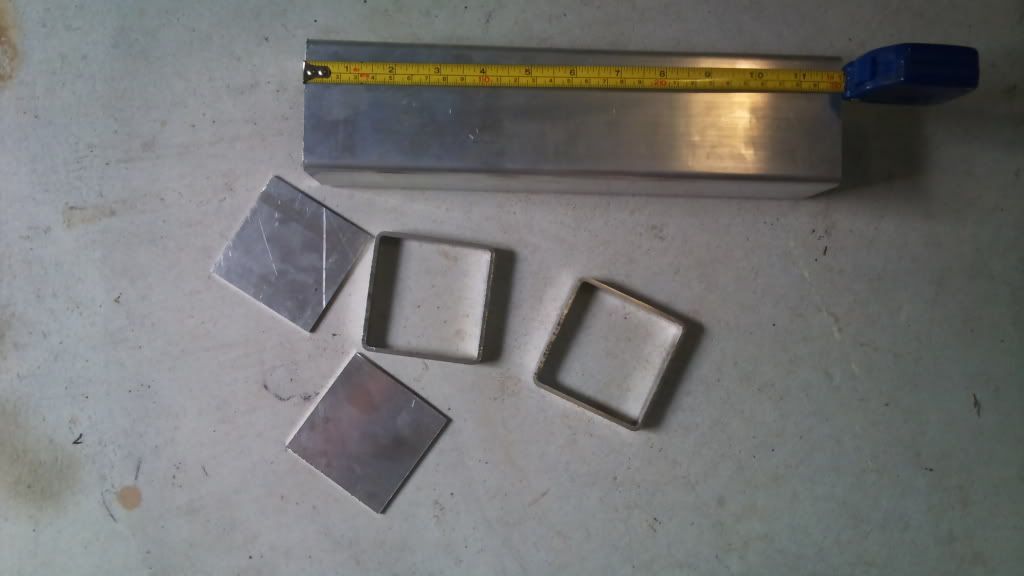
If I was doing that there would be a lot less parts for me to braze:
Braze Plenum to 3 inch box section
Braze on two pieces of ally plate to blank off the ends.
What i've currently got has about 12 pieces to it with the core in the middle which I know think of as the best heat sink in the world.
Just re-tested for water leaks and oh bugger it's still leaking so I went mental with the brazing rods. I shall re-test later on when it's cooled down.
If it's still leaking after this how about epoxy or silicone inside or is that a big no-no?
Or how about I throw the whole lot in the bin and go with a front mount IC?
If I was doing that there would be a lot less parts for me to braze:
Braze Plenum to 3 inch box section
Braze on two pieces of ally plate to blank off the ends.
What i've currently got has about 12 pieces to it with the core in the middle which I know think of as the best heat sink in the world.
-
Shane001
- Oldtimer
- Posts: 2730
- Joined: Tue Jul 21, 2009 5:00 pm
- Location: Sydney
- Contact:
Re: Robs new project Supercharger
Personally I think it's great that you gave this a go but I think if you're still having problems with it sealing, I'd be debrazing the whole thing and take it to a professional to weld together for you, and put this down to a good idea at the time 
-
clint111

- Grease Monkey
- Posts: 187
- Joined: Wed Sep 07, 2011 3:27 pm
- Location: Sydney
- Contact:
Re: Robs new project Supercharger
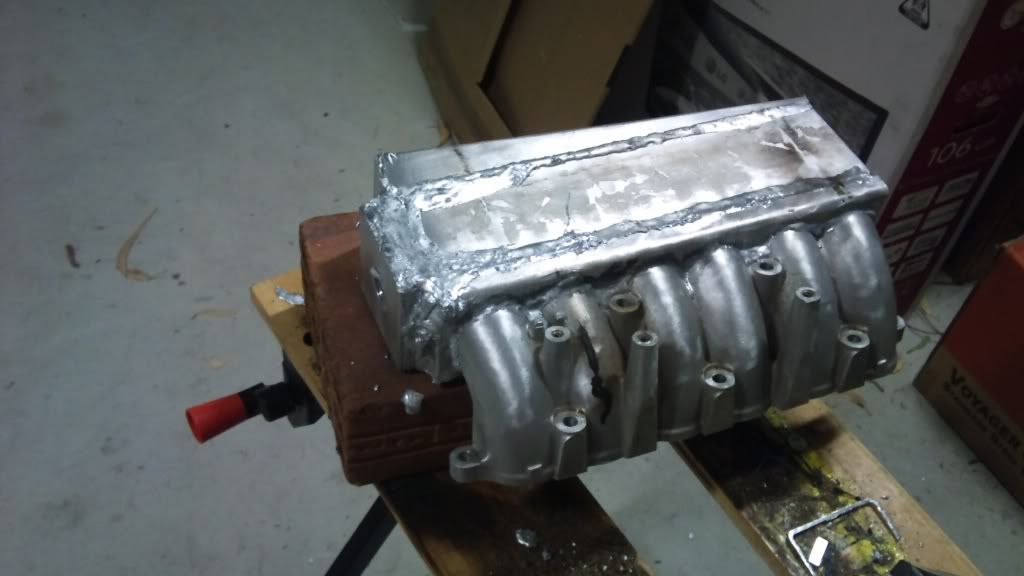
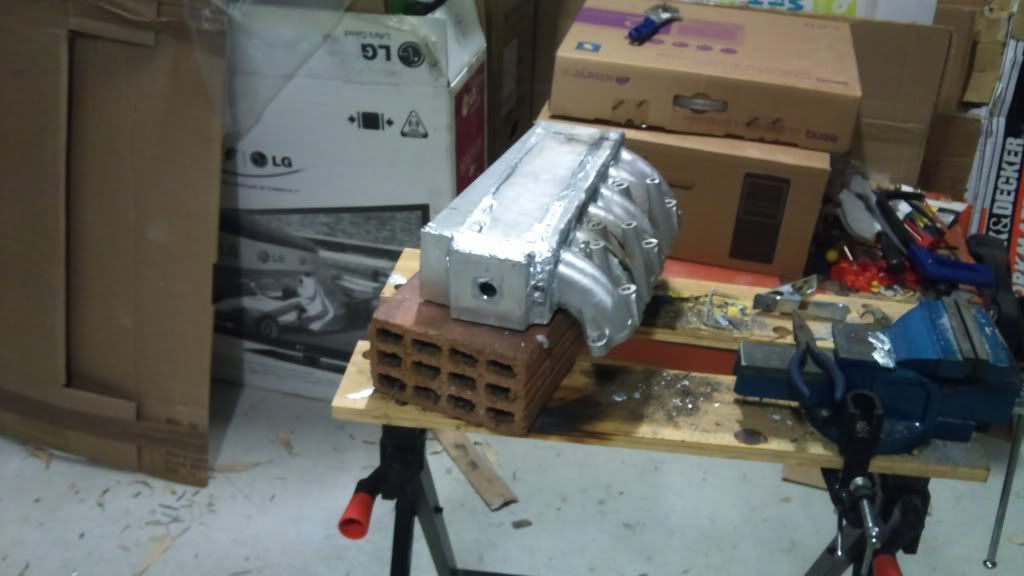
You are using a roots type supercharger, why not just make a plenum, andtop centre mount it between the heads, just like old school v8's do? No I/c though.
This is what I am doing..
This is what I am doing..
-
Rob Furniss
- Oldtimer
- Posts: 1394
- Joined: Wed Jan 19, 2011 11:32 pm
- Location: Perth
- Contact:
Re: Robs new project Supercharger
Thanks Shane, i've just put water in again and it's still leaking - not as bad but any amount is no good.Shane001 wrote:Personally I think it's great that you gave this a go but I think if you're still having problems with it sealing, I'd be debrazing the whole thing and take it to a professional to weld together for you, and put this down to a good idea at the time
I have a new plan and then I may give up and take it to a pro like you suggested as I don't want the engine going pop due to me trying to save a few pennies.
I made the water end tanks by cutting through a piece of box section and then brazing ally plate onto them, I then brazed the outside of this to the core.
I'm going to de-braze the plate and remove it so I can get at where section meets the core and then braze the inside of the section to the core, then redo the outside, then braze the plate back on and checkfor leaks again.
-
Rob Furniss
- Oldtimer
- Posts: 1394
- Joined: Wed Jan 19, 2011 11:32 pm
- Location: Perth
- Contact:
Re: Robs new project Supercharger
Yes it's an Eaton M45.clint111 wrote:You are using a roots type supercharger, why not just make a plenum, andtop centre mount it between the heads, just like old school v8's do? No I/c though.
This is what I am doing..
Above 6psi It will need cooling (or so i'm told), my old one used to run in excess of 50 degrees C in UK weather at 6-7psi (I had before and after temp probes), or is 50 degrees not a lot?
I'm planning on running 8psi so want to minimise the chance of det as much as possible, hell maybe a little water leaking in wouldn't be too bad after all!
-
clint111
- Grease Monkey
- Posts: 187
- Joined: Wed Sep 07, 2011 3:27 pm
- Location: Sydney
- Contact:
Re: Robs new project Supercharger
Misted water injection, ok, water leak, no. Water doesn't compress, your piston crowns will!
If you are prepared to re think your sc, look at the whipple w100ax. More efficient, cooler charge air.
And anyways, 50c I would not be unhappy with!
If you are prepared to re think your sc, look at the whipple w100ax. More efficient, cooler charge air.
And anyways, 50c I would not be unhappy with!
-
Astron_Boy
- Trolling Gen Y
- Posts: 8400
- Joined: Sun May 27, 2007 5:00 pm
- Location: Wine Country NSW
- Contact:
Re: Robs new project Supercharger
2nd this.Shane001 wrote:Personally I think it's great that you gave this a go but I think if you're still having problems with it sealing, I'd be debrazing the whole thing and take it to a professional to weld together for you, and put this down to a good idea at the time
I wouldn't give up so quickly.
Ultimately, with no offense intended, but the welds are nub.
Done by a pro, and you will have exactly what you are after.
I applaud you for giving it a go, it would have been tops for it to work out 100%, but given it's not, go back to square one, pay the man and know you have what you wanted from the start.
Honestly I wouldn't have even had a go, so you've done better than me, and you've had some practice for other things to do now.
-
Rob Furniss
- Oldtimer
- Posts: 1394
- Joined: Wed Jan 19, 2011 11:32 pm
- Location: Perth
- Contact:
Re: Robs new project Supercharger
I'm slowly getting convinced, will carry on a bit more but I take both your points and can see where this is going to end up.
And it does look pretty shite.
And it does look pretty shite.
-
Shane001
- Oldtimer
- Posts: 2730
- Joined: Tue Jul 21, 2009 5:00 pm
- Location: Sydney
- Contact:
Re: Robs new project Supercharger
I agree with Clint, 50degC is not that hot for turbo/supercharged intake temps. And if you run a PULP E10 or E85 fuel this will help cool the charge, and give you a lot of safety margin on your timing. And agree also you can easily add a water injection kit if needed.
Back to the project at hand though, the work you've done cutting and fitting all the bits won't go to waste if you disassemble and take it in to be welded, and the skills you've learned brazing will come in handy for other projects in the future, but imo (and in hindsight of course ) brazing was probably not the way to go for this project, simply too many parts and too many complicated parts.
Awesome effort to get this far with it and persist as you have, and I personally wouldn't see it as quitting, just a realisation that this is not going to work as you'd hoped and making a new decision to finish the job welded rather than brazed.
Back to the project at hand though, the work you've done cutting and fitting all the bits won't go to waste if you disassemble and take it in to be welded, and the skills you've learned brazing will come in handy for other projects in the future, but imo (and in hindsight of course
Awesome effort to get this far with it and persist as you have, and I personally wouldn't see it as quitting, just a realisation that this is not going to work as you'd hoped and making a new decision to finish the job welded rather than brazed.
-
Shane001
- Oldtimer
- Posts: 2730
- Joined: Tue Jul 21, 2009 5:00 pm
- Location: Sydney
- Contact:
Re: Robs new project Supercharger
And also if you're running 8psi you really should be looking to pressure test this to at least 1 bar, and probably while hot. Remember the alloy while running under the bonnet will be getting close to 100degC operating temps, so the welds have to hold up while hot and under pressure.
-
Astron_Boy
- Trolling Gen Y
- Posts: 8400
- Joined: Sun May 27, 2007 5:00 pm
- Location: Wine Country NSW
- Contact:
Re: Robs new project Supercharger
too true.Shane001 wrote:I agree with Clint, 50degC is not that hot for turbo/supercharged intake temps. And if you run a PULP E10 or E85 fuel this will help cool the charge, and give you a lot of safety margin on your timing. And agree also you can easily add a water injection kit if needed.
Back to the project at hand though, the work you've done cutting and fitting all the bits won't go to waste if you disassemble and take it in to be welded, and the skills you've learned brazing will come in handy for other projects in the future, but imo (and in hindsight of course
Awesome effort to get this far with it and persist as you have, and I personally wouldn't see it as quitting, just a realisation that this is not going to work as you'd hoped and making a new decision to finish the job welded rather than brazed.
Ultimately if it was just cosmetic uglingess (nothing that couldn't be fixed) then it wouldn't be an issue, but as it's leaking, it kinda does make the whole thing suck to a degree of reconsideration.
Anything else I say simply mimics Shane.
-
clint111
- Grease Monkey
- Posts: 187
- Joined: Wed Sep 07, 2011 3:27 pm
- Location: Sydney
- Contact:
Re: Robs new project Supercharger
Rob, if your leaks are tiny, like pinhole tiny, then keep in mind also, getting the whole thing powdercoated at the end will seal those pinholes, and also help to improve the aesthetics..
-
Rob Furniss
- Oldtimer
- Posts: 1394
- Joined: Wed Jan 19, 2011 11:32 pm
- Location: Perth
- Contact:
Re: Robs new project Supercharger
Thanks Clint, I haven't given up yet but don't worry I won't put something on my car that's going to leak water into the engine so if I can't fix it I will have to go to a pro.clint111 wrote:Rob, if your leaks are tiny, like pinhole tiny, then keep in mind also, getting the whole thing powdercoated at the end will seal those pinholes, and also help to improve the aesthetics..
I know where there's a powder coating place near me so will get a qoute, do you know how this affects heat dissipation?
-
Shane001
- Oldtimer
- Posts: 2730
- Joined: Tue Jul 21, 2009 5:00 pm
- Location: Sydney
- Contact:
Re: Robs new project Supercharger
Better still have them ceramic coated. I'm considering this for the racecar. If you're going to do this though you really need to match it with some phenolic type gaskets to minimise heat transfer through the metal from the engine.
-
Rob Furniss
- Oldtimer
- Posts: 1394
- Joined: Wed Jan 19, 2011 11:32 pm
- Location: Perth
- Contact:
Re: Robs new project Supercharger
Yeah that's a good idea, someone on FTOOC had a few made but that was years ago, anyone over here do them for the FTO?Shane001 wrote:Better still have them ceramic coated. I'm considering this for the racecar. If you're going to do this though you really need to match it with some phenolic type gaskets to minimise heat transfer through the metal from the engine.
In fact now that I think about it more that's a brilliant idea, depending on cost.
My leak issue at the moment though is an internal one where the blanking plate for the air chamber meets the end tank for water so i'm going to remove the blanking plate from the water end tank to get at the inside and seal around the inside of the end tank, that should do the trick.
I should have worked inside to out sort of and put blanking plates on last but I thought I was saving time making the end tanks with blanking plates on already while I was waiting for my core to arrive, you live and learn (hopefully).
-
Rob Furniss
- Oldtimer
- Posts: 1394
- Joined: Wed Jan 19, 2011 11:32 pm
- Location: Perth
- Contact:
Re: Robs new project Supercharger
I've just removed the blanking plate from the water end tank and brazed the inside of the tank to the core, then re-brazed the blanking plate onto the end tank.
Just waiting for it to cool down so I can perform another leak test in the morning, fingers crossed that this has solved the problem.
Down to only 2 rods (again) and I only received these the other day, also on my 5th bottle of mapp gas, looks like it would have been cheaper for a pro to do it.
Just waiting for it to cool down so I can perform another leak test in the morning, fingers crossed that this has solved the problem.
Down to only 2 rods (again) and I only received these the other day, also on my 5th bottle of mapp gas, looks like it would have been cheaper for a pro to do it.