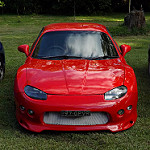
The 6a12 beast is going to be in the garage for a little while. I recently did a top-end rebuild on it, upgrading all seals, belts, etc.
Definitely going to miss the engine, treated me very very well, only having done 110,000kms, but its time for Stututututuu.
- IMG_4633.JPG (876.92 KiB) Viewed 7745 times
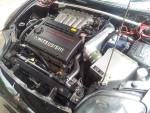
This thread will outline all the details regarding the swap of the 6a13tt into my FTO, and also includes some other work to the car that was highly required. The basic plan is to upgrade all the parts on my car to support the engine, including braces, rear suspension, battery relocate etc before swapping the engine in, to see how stable I can get the FTO to run before the 6a13tt goes in, as well as to reduce troubleshooting in the future. So firstly the supporting mods will go on, and will be tested, then the 6a13tt will be dropped in. The engine will be dropped in completely stock, at 140,000kms, bought from a wrecking VR4 Legnum over east. The goal is to get the car running properly on stock parts, and upgrade all other sections of the car to properly support the power. In the future I will look at forged internals with upgraded turbos, but currently I just want it to be swapped properly and to be reliable.
The budget is set to ~$9000, and should ideally take approximately a month worth of work, being done in my garage.
[Note this thread will be photo heavy!]
I have already purchased all the materials and parts required for this build. The main parts include:
- 2001 Legnum 6a13tt Engine (With wiring loom, IC, and all associated piping)
- WaveTrac LSD (With Koyo Bearings and Speedo Gear)
- GFB Boost Controller
- GFB Deceptor Pro 2 BOV
- Battery Relocation Equipment (Box, cables, distribution block etc)
So the build began today, upgrading the rear suspension components:
- 1.JPG (808.36 KiB) Viewed 7745 times
I began installing the following parts in the above picture;
- 24mm Signature Adjustable Swaybar
- HardRace Adjustable Rear Toe Arms
- HardRace Adjustable Rear Camber Arms
- Evo1-3 Rays Rear Lower Control Arms
- Adjustable Whiteline Front + Rear Droplinks
- 2.jpg (786.34 KiB) Viewed 7745 times
This is a comparison between the stock swaybar and Selby's Signature 24mm swaybar, much thickness, much wow.
To bolt this swaybar on, I had to drill some holes into the mounting brackets. I either had the choice of using a rivnut, or using a bolt with a spring washer and nut. I went with the bolt and nut method, since I'd have to drill a larger hole for the rivnut, and didn't want to compromise the strength of the metal, since there was only a little metal left between my drilled hole, and the original mounting point of the stock swaybar, as shown in the below pictures. Then drilled a perfect hole, sanded it, and bolted the bush and bracket in
- 3.jpg (736.57 KiB) Viewed 7745 times
- 9.jpg (407.64 KiB) Viewed 7745 times
- 10.jpg (588.19 KiB) Viewed 7745 times
The bolt/washer/nut method worked quite well:
- 11.jpg (400.94 KiB) Viewed 7745 times
- 12.jpg (431.82 KiB) Viewed 7745 times
Also props to the previous owner, who used the upgraded lancer swaybar mounts, with the double sheet welding at the top of the mount which prevents cracking. According to Bennoz, the part number is MR554491. No wonder my Toyo R888R's didn't rip through the mounts!
Front:
- 13.jpg (659.5 KiB) Viewed 7745 times
Back:
- 14.jpg (505.68 KiB) Viewed 7745 times
Swaybar was then ready to be mounted to the car:
- 15.jpg (882.4 KiB) Viewed 7744 times
The Wavetrac LSD from the 3G Eclipse also arrived today, costing $1500 shipped. Special thanks to Michael Copley from Raventech Racing for importing it for me, and giving me quite a decent price for it. If anyone else is after it, send him an e-mail and mention me!
Very solid product, cant wait to test it out!
- 4.jpg (540.34 KiB) Viewed 7744 times
- 8.jpg (454 KiB) Viewed 7744 times
Got the Speedo gear and Koyo/Mitsubishi Bearings from Amayama:
- 5.jpg (354.7 KiB) Viewed 7744 times
The Koyo Bearings seem really solid, not sure if they're completely OEM spec, or slightly upgraded. Either way, I'm happy!
- 6.jpg (463.22 KiB) Viewed 7744 times
- 7.jpg (591.32 KiB) Viewed 7744 times
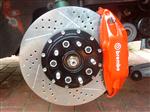
Solid amount of progress on the car today, and much more to come tomorrow. The rear HEL Braided brake lines were installed today too. Rear pads and rotors were removed, as I shall install some RDA/EBC (Redstuff) Rotors and Pads, temporarily until my brembo upgrade in the months to come. Little bit of a setback with the rear caliper; I was going to rebuild it, as I was having issues with it, however after further inspection I will need a new piston and possibly a clean up of the caliper. Really bad condition on this particular caliper which is strange. Though I should address this issue tomorrow and it should be ready to be installed.